
Nov 30, 2016
Elegant Brush Script
And it is day 3 already featuring the products of the new Craftin Desert Divas release. I created a project using the new "Elegant Brush Script" stamp set which is just wonderful. It includes both upper and lower case letters in a beautiful font.

To create this snow globe scene I also used the "Snow Day" set from day 2 as well as the "Shake It Up" die set.

You also have the chance to win this stamp set. Just make sure to "be going" to the release event on Facebook and find the give away post that has more information. Just click on the picture below to get to the event.

Read more

To create this snow globe scene I also used the "Snow Day" set from day 2 as well as the "Shake It Up" die set.

You also have the chance to win this stamp set. Just make sure to "be going" to the release event on Facebook and find the give away post that has more information. Just click on the picture below to get to the event.
Nov 29, 2016
Snow Day
Hi everyone and welcome back to day 2 of sneak peeks for the new Craftin Desert Divas release. Today I am sharing with you a card using the new "Snow Day" stamp set and the new "Outdoor Landscape 2" dies as well as the new "Inside Scalloped Squares" from day 1.

I think these products are fantastic as you can create so many great scenes with them.

You also have the chance to win this stamp set. Just make sure to "be going" to the release event on Facebook and find the give away post that has more information. Just click on the picture below to get to the event.
Nov 28, 2016
Dragon Festival - easy CAS card
Hi everyone! Today start the sneak peeks for the new release by Craftin Desert Divas. And let me tell you - it's simply amazing! There are so many super fun products coming! For day 1 I created this clean and simple card using stamps from the new "Dragon Festival" stamp set.

To create this card I was I inspired by a video tutorial by Jennifer McGuire. It is so easy to create the sentiment background that I created 4 cards at once.

You also have the chance to win this stamp set. Just make sure to "be going" to the release event on Facebook and find the give away post that has more information. Just click on the picture below to get to the event.
Nov 25, 2016
DIY Christmas Ornaments
Hi everyone, I am back with another fun project. I was at a craft fair a couple of weeks ago and found these clear acrylic Christmas ornaments and thought that it would be a fun crafty project to decorate them with moss and stamped images. So I went outside to get some moss and dried it for a couple of days. I chose the adorable Waddle and Jingle digi stamps by Craftin Desert Divas to include in the ornaments.

So I downsized the images so they would easily fit in the ornaments and because I wanted the images to be on both sides, I mirrored them and printed two versions for each ornament. Then I colored them with alcohol markers. Since the images were really small I only did some basic coloring without much shading (apart from the penguin's hat). After fuzzy cutting the images (or rather let them be fuzzy cut by my cutting machine) I adhered the original and mirrored images together.

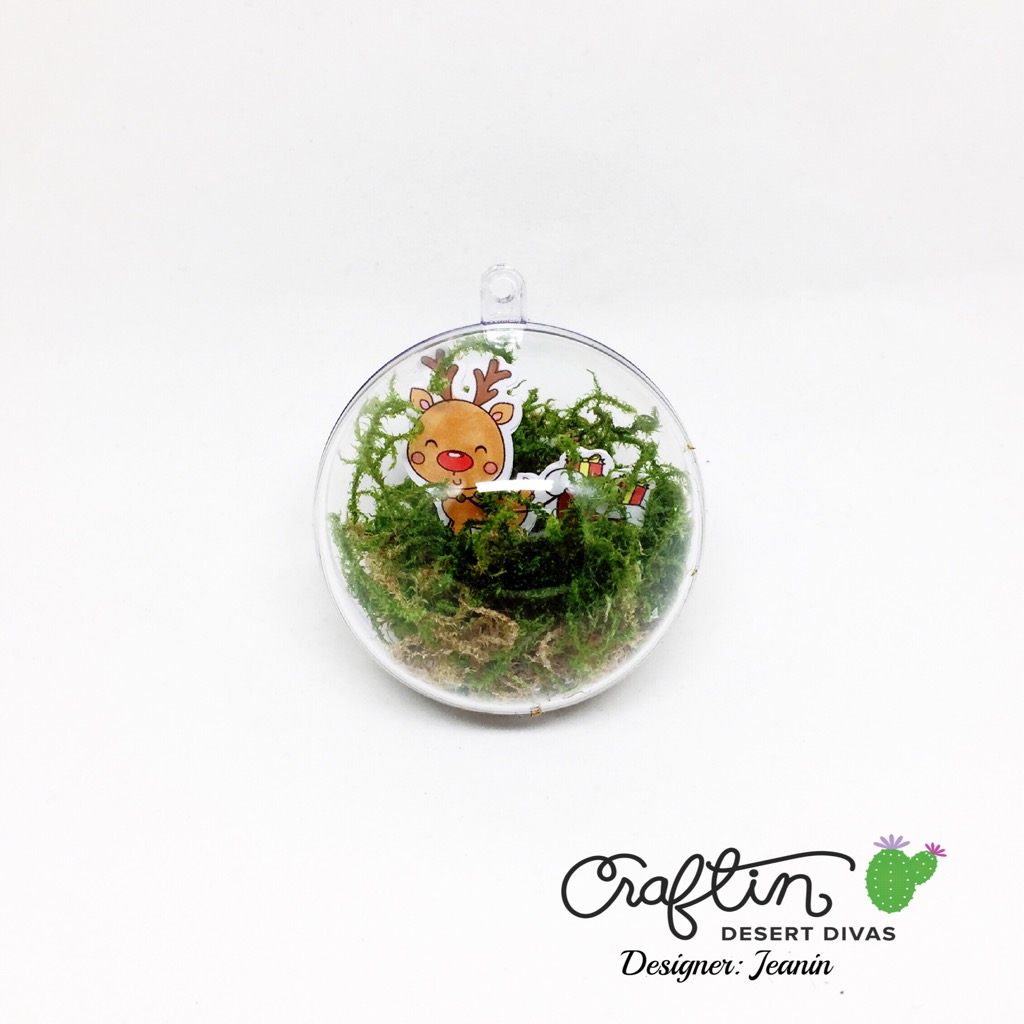
I cut the moss in place and glued each image on top using a hot glue gun. Then I cut easily place the moss and the image in my Christmas ornament.


I really hope you like this idea and give it a try. These would also make perfect Christmas gifts. See you soon!
Nov 17, 2016
Twist and Pop Christmas Card
Hi everyone, I am back with a fun interactive Christmas card. I made this card with the help of this video tutorial showing how to create a twist and pop card. I love how this card turned out but let me tell you it's pretty hard to get a decent picture of it. Keep in mind that this card is quite bulky if you'd like to make a twist and pop card. You can find a video of how the card opens and closes at the end of the blog post.

After creating the basic cutting and scoring of the pieces I needed for this card (check out the video tutorial linked above), I started to decorate the inside piece. Using the Outdoor Landscape Die, I die cut a snowy hill that was large enough to cover the complete inside piece. Using blue ink and a brush, I created a light sky background. Then, I stamped the adorable images of the Santa's Helpers stamp set with a water-resistant ink, colored them in with Zig markers, and adhered them to the inside piece. I'd recommend not to use any foam adhesive as the card is already quite bulky. Keep it as flat as possible on the inside. To finish the inside piece, I stamped the sentiment "Merry Christmas" with red ink in the top center of the panel.

I wanted to leave the outside of the card to be very simply. First, I die cut a scalloped panel from white card stock using the largest of the Fancy Frame Dies. I used a polka-dot embossing folder on the white panel because I thought it would look like snow. To create some contrast, I embossed the sentiment "Let it snow" from the Santa's Helpers set on black card stock, die cut a flag banner using the Flag Banner Die set and adhered it to the background panel with a bit of foam tape.
I really hope you enjoyed this card. Have a great day and see you soon!
Subscribe to:
Posts (Atom)